Mastering the Flatlay Part 2: editing
- Apr 8, 2020
- 3 min read
Updated: Apr 15, 2020
After taking photos of those beautiful flatlays, it’s likely they’re going to need a liiiiittle bit of a touch-up. If you need help with this, see Part 1.
Everyone does it differently and soon you’ll develop your own signature editing style!
Here’s how I edit mine, Let’s get started..

Method 1 – Photoshop/PhotoPea.com
This is the method I use on my PC using Adobe Photoshop however you can use an online editor called PhotoPea.com to achieve the same results.
1. Make it brighter-

Open your file, create a new adjustment layer, choose Brightness/Contrast. Increase the brightness enough that it’s much lighter but not blowing out the highlights.

I increased the Brightness to 130 and Contrast to 20.
2. Removing and changing unwanted colours and tones-
In the image, there’s too much blue making it appear cool and we want to eliminate that.
Create a new adjustment layer, choose Hue/Saturation.

Change your range from Master to Blues, then decrease the Saturation slider to about -80.
(If there was still some cooler tones left, I’d do the same with the Cyans. Similarly, If my image was too warm, I would do the same thing with the reds, yellows, and/or magentas. This requires a bit of play and every photo is different depending on your lighting and ultimately what you want the final result to look like.)
I also think the greens are too much on the bluer, cooler side, but I don’t want to desaturate it, I want to make them more yellow:
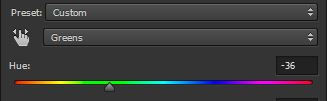
Choose Greens and decrease the Hue slider to -36.

Above is a close-up of what we did in total!
3. Make the shadows lighter and the paper darker
This step isn’t essential, and I don’t do it every time, however, it can be really useful if you’ve got areas of your image that are in too much shadow or dark elements that are too light.

Right-click on your Background Layer and select Duplicate Layer. This ensures that if we make a mistake, we have our original layer as back up. *Don’t right-click the little image on the layer, this will give you a different set of options

Next, click and hold the icon in the sidebar that looks like a lollipop. This will give you some tools that will lighten your photo (Dodge Tool) or darken your photo (Burn Tool)

At the top, you can change your brush size, whether you want to affect the shadows, midtones or highlights and the %strength of the brush. I usually keep mine at 15% because it’s already super strong!

Then use those brushes to paint where you’d like it to be lighter (dodging) and where you’d like it to be darker (burning). Above you can see I’ve lightened the corner for a better wash of light and darkened the paper.
The Final Image

Here it is, our final product! Soon I’ll be posting how you can superimpose your digital drawings onto a pre-existing photo like this one (:
Method 2 - Afterlight
If I need to edit a photo using my iPad or phone, I’ll use the free features from Afterlight. There isn’t as much control, but I can at least increase the brightness and do some minor colour correcting.

It's still pretty effective! There are dozens of other editing apps you could use and most have very similar brightness, contrast and colour sliders, however, I've been using Afterlight for a while and it works well for me.

Above are the settings I used to achieve this look:
EXTRA TRICK – Adding faux shadows
In Part 1 I mentioned you could add faux shadows into your flatlays, and it’s really easy as long as you don’t have too many taller items in your photo. You can find shadows on Google, Pinterest and Creative Market. You may even choose to make your own (:

Here’s a palm shadow I found on Google.

All you need to do is:
Copy and paste it into your file (this will create a new layer)
Then change the Blend Mode from Normal to Multiply.
This will hide the white background and leave only the dark shadow.
I also decreased the opacity to 83% to make it more transparent.

Here’s what it looks like (:

And that's it for Part 2!
I hope I've shed some light on the editing process and shown you that it doesn't have to be complicated. If it's helped you out please do me a little favour and share this guide with others, as there’s a good chance that it will help them too (:
Bonus tip: I learnt a long time ago that the better you shoot it in-camera, the easier it is to edit so always keep that in mind when shooting (:
Until next time beautiful buds ♡


Comments